

Repair welding is one of the undeniable strengths of MIG/MAG welding. Especially in hands-on, non-digital businesses, repairing various work machines, equipment, and structures is part of everyday life. Brackets break, frames bend, and cracks appear. And in situations like these, MIG/MAG welding shines. The same applies to any environment where steel structures are part of daily operations—from a technical prototyping workshop to a janitor’s tool shed, not to mention mechanics and repair professionals. That’s why, in my opinion, every company should have a small set of high-quality welding equipment waiting in the workshop corner—and at least one skilled person to use them.
Fundamentally, repair welding is the same as welding a brand-new piece—at least when it comes to the welding itself. The biggest difference lies in the preparation of the area to be repaired before the actual welding, as well as, depending on the case, the post-processing.
In this article, we’ll go through a real-life example of repairing a broken part of a work machine.
Quick links to content:
Mental preparation
Removing and cleaning the parts
Surface preparation and tools
Repair welding
Finishing after welding
Mental preparation
First and foremost, written in bold letters: preparing the parts usually takes much more time than the actual welding. When working with new pieces, this varies, but in repair welding, preparation can easily take up 95% of the total work time. Before you get to the welding, you’ll need to clean, fit, protect, adjust, refit…
Accept this fact and take your time with the preparation. This phase is just as much a part of the repair process as the welding itself. You’ll save yourself a lot of frustration by doing it properly and thoroughly. Plus, good preparation has significantly impact on how enjoyable the job is to do.
Removing and cleaning the parts
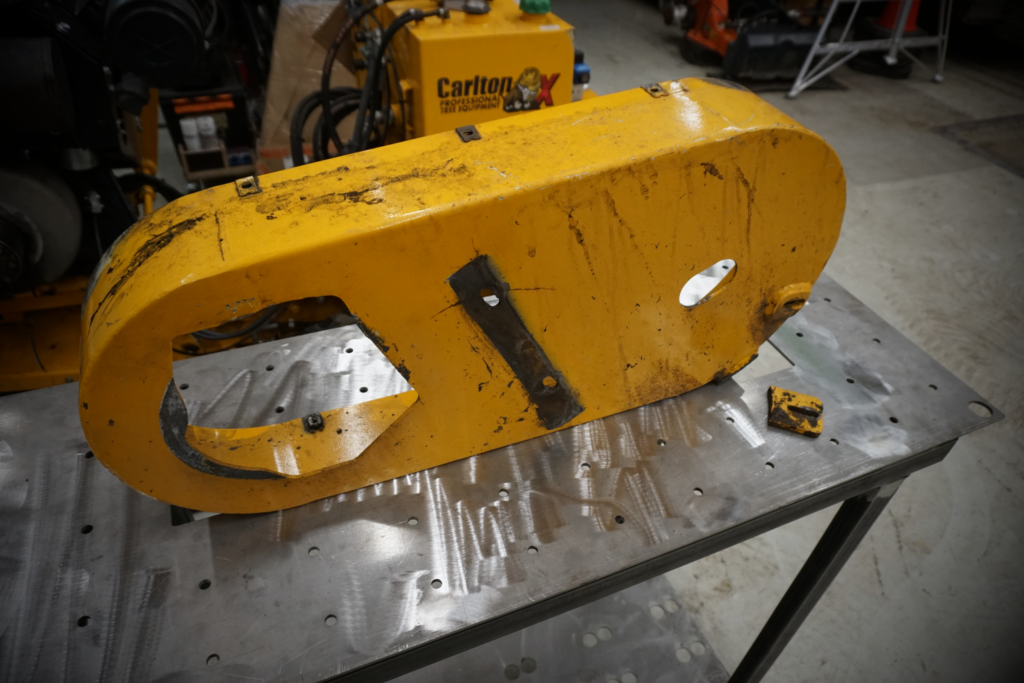
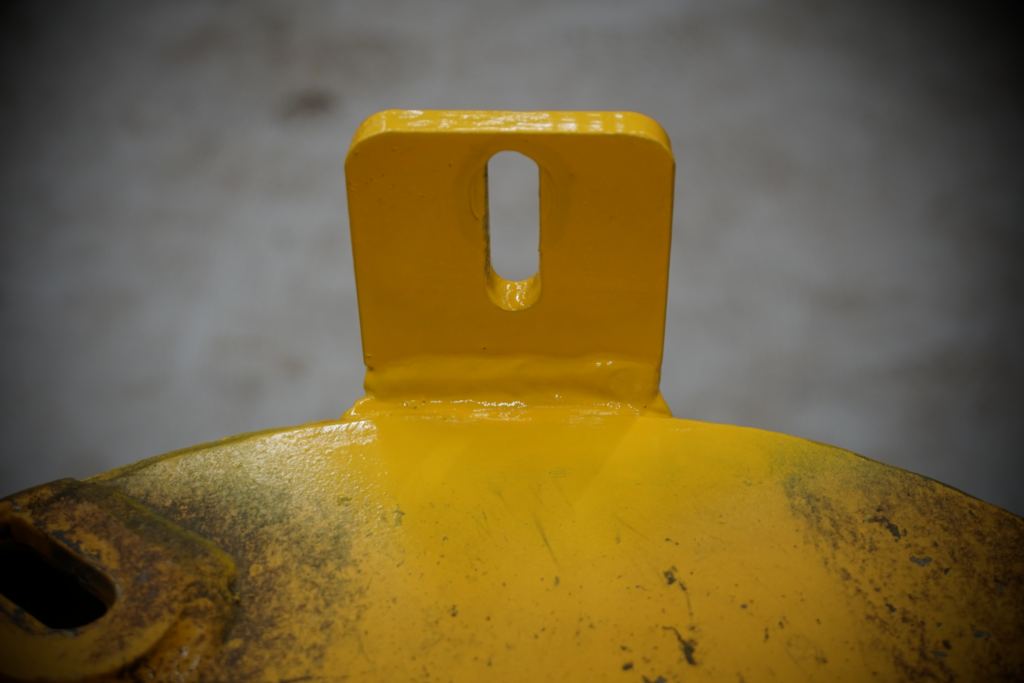
This particular job was to repair a broken bracket of a protective casing from a heavily used stump grinder. Casing material unalloyed steel. A very typical repair task. The casing was powder-coated and, over the years, had been soaked in grease and covered in dirt. The work began by dismantling the casing from the machine.


This particular bracket was a fairly grateful repair job because the crack was caused by vibration rather than impact. The bracket remained in its original shape and fit perfectly back into place. Often, this isn’t the case—parts may need to be bent and reshaped to fit, or in many cases, a completely new piece must be made.

When working with new pieces, surface cleaning is usually a quick and easy process. In repair welding, however, this step requires significantly more effort. I start by scraping off any loose debris, sand, and dirt. For this, I use a sacrificial junk knife, but any scraping tool will do. Next, I wipe away the ingrained dirt and grease by vigorously scrubbing with a coarse cotton rag. A degreaser can be used if desired, but personally, I don’t find it necessary.


Surface preparation and tools
Next, it’s time to remove the paint and prepare the welding surfaces. When working with new pieces, an angle grinder and a flap disc are often enough. However, in repair welding, you usually need to reach into corners and recesses where a flap disc won’t fit, so a few extra tools are usually necessary.
My go-to tool list looks like this:
- Angle grinder 125mm + flap discs (grit 60 and 80)
- One-handed mini angle grinder (75mm) + 1,0mm cutting discs
- Small die grinder + tungsten carbide rotary burrs (fairly small size)

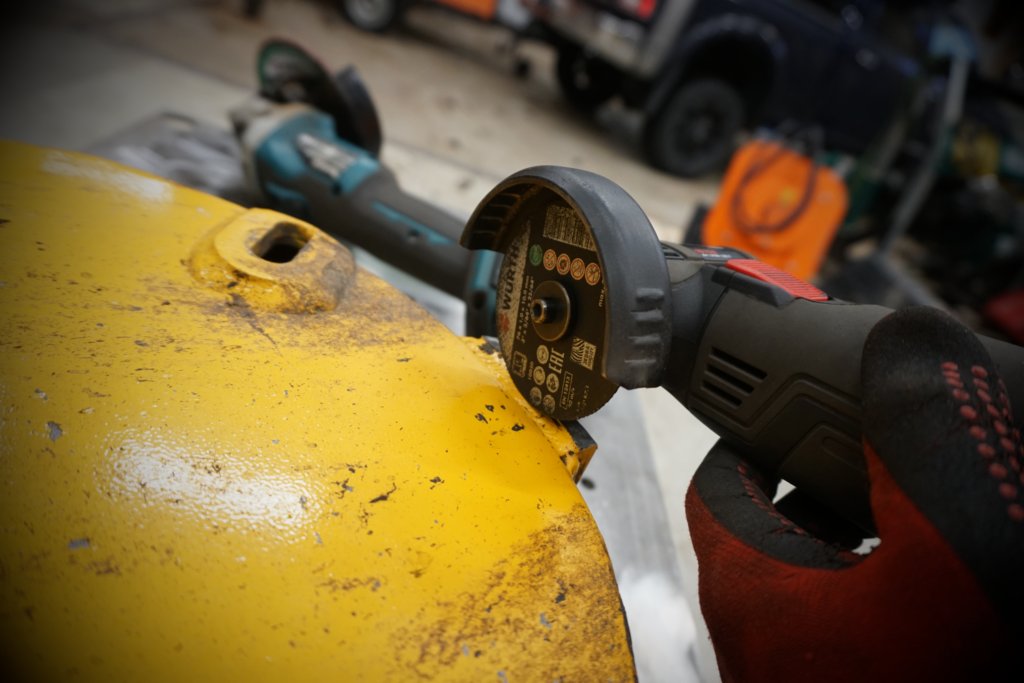
Besides its bulky size, a flap disc has another weakness when prepping for repair welding. When grinding off powder coating, the flap disc quickly clogs up and stops cutting through the coating—it just ends up smearing melted powder paint across the surface. A cutting disc, on the other hand, slices cleanly through powder coating without this issue. Plus, it can reach areas where a flap disc won’t fit. That said, keep in mind that cutting discs are NOT meant for grinding—applying pressure sideways to a cutting disc can cause it to crack and shatter explosively. So, I’m not recommending or encouraging their use for this purpose—just casually noting that they work exceptionally well.
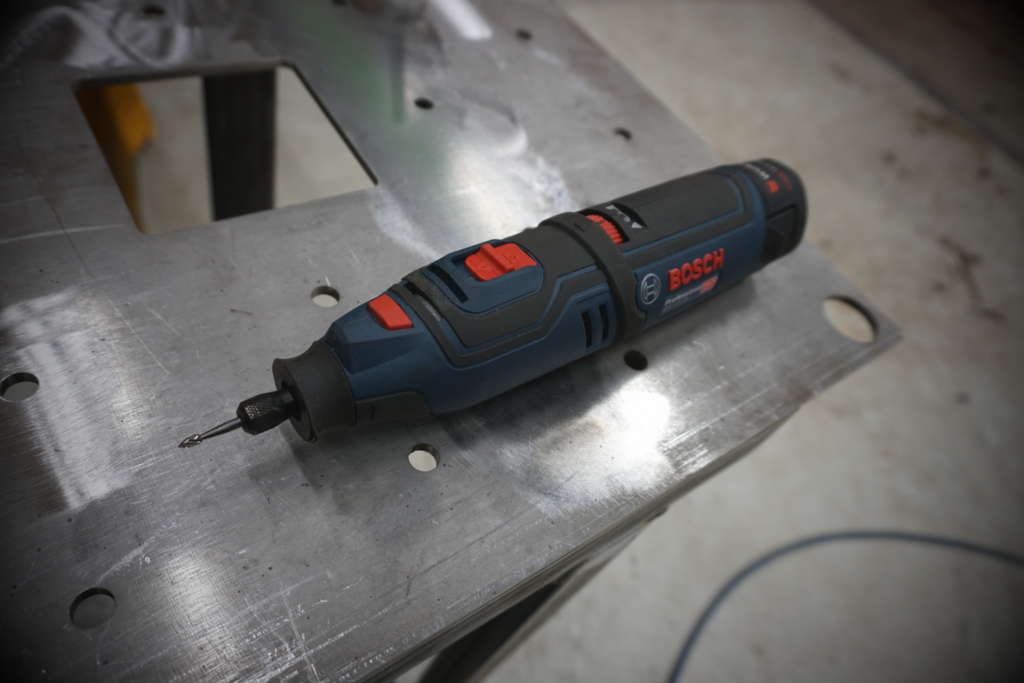

Rotary tungsten carbide burrs in a die grinder are the go-to tool for cleaning out tight corners or small recesses in the middle of a part. Essentially, they reach the spots where even a cutting disc can’t.
In the piece featured in this article, the original weld had small recesses in the corners that no other tool besides a small rotary burr could reach.
You can find cheap versions of these tools at any hardware store. They work for occasional use, but if you do this kind of work regularly, I highly recommend investing in higher-quality burrs—the difference is significant.
I personally get mine from TKP-Toolservice, where they cost around 10€ each.

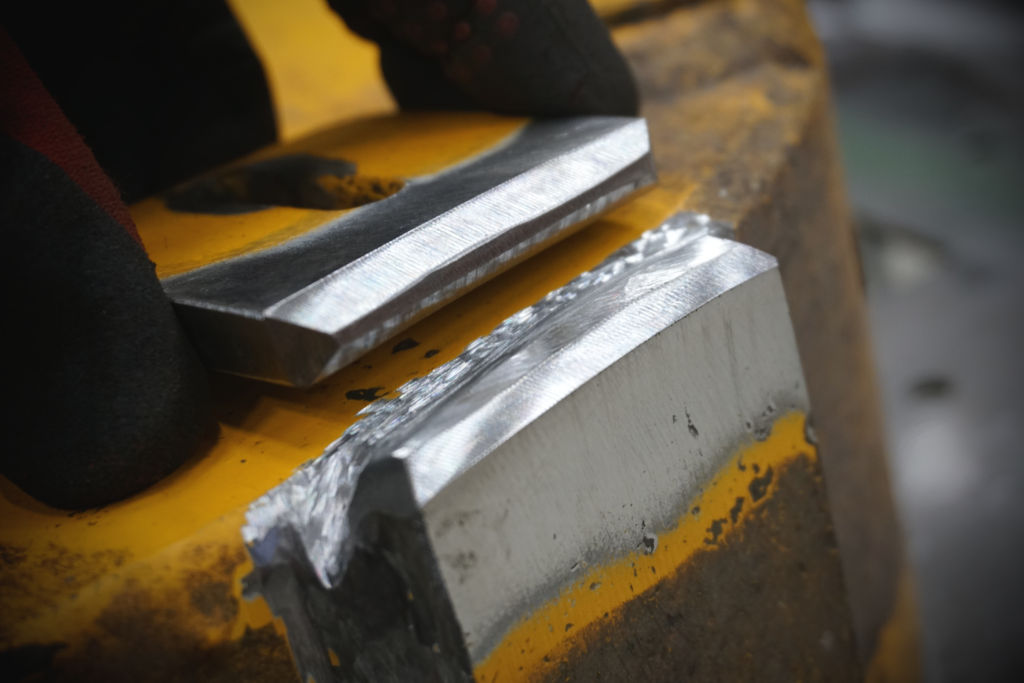
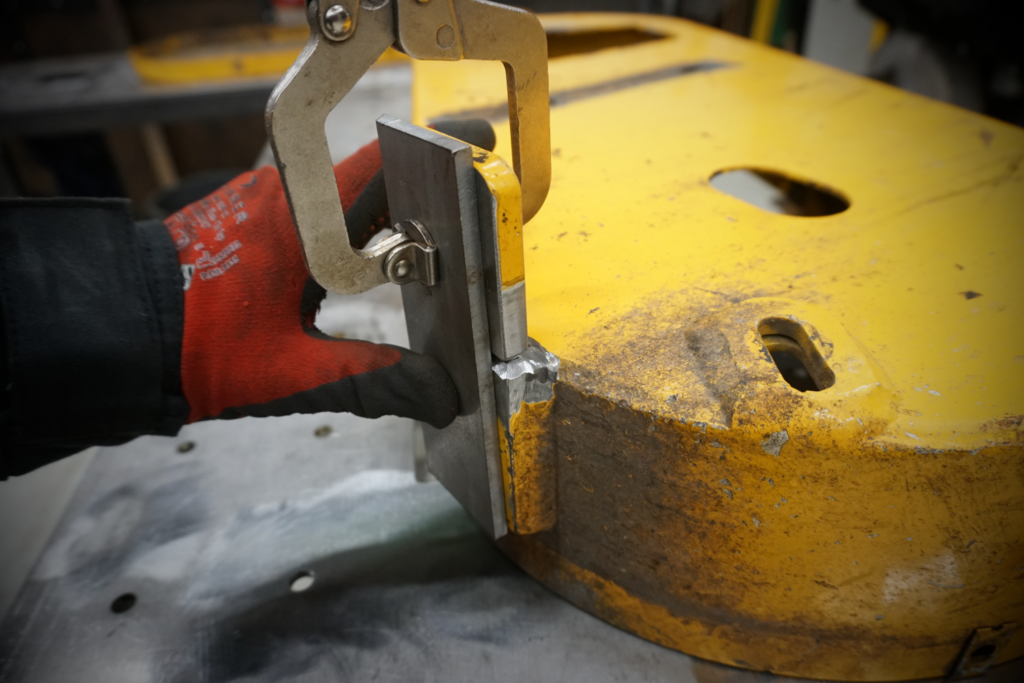
All surfaces in the weld area must be COMPLETELY cleaned by grinding. Even in this case, where the bracket had broken off very cleanly, the surfaces inside the crack were also ground to remove any impurities. This step requires some precision to ensure the bracket still fits properly after grinding. Around the joint to be welded, a 20–30mm clean area should be prepared as a workspace.
Think of it this way: under the welding arc, the only things melting should be the steel being welded and the filler wire from the welding torch. The weld pool should be surrounded by nothing but shielding gas. Anything else is contamination and interferes with the weld. That’s why the surface is cleaned—to ensure there’s no paint, dirt, grease, food, rust, sweat, or other bodily fluids present.
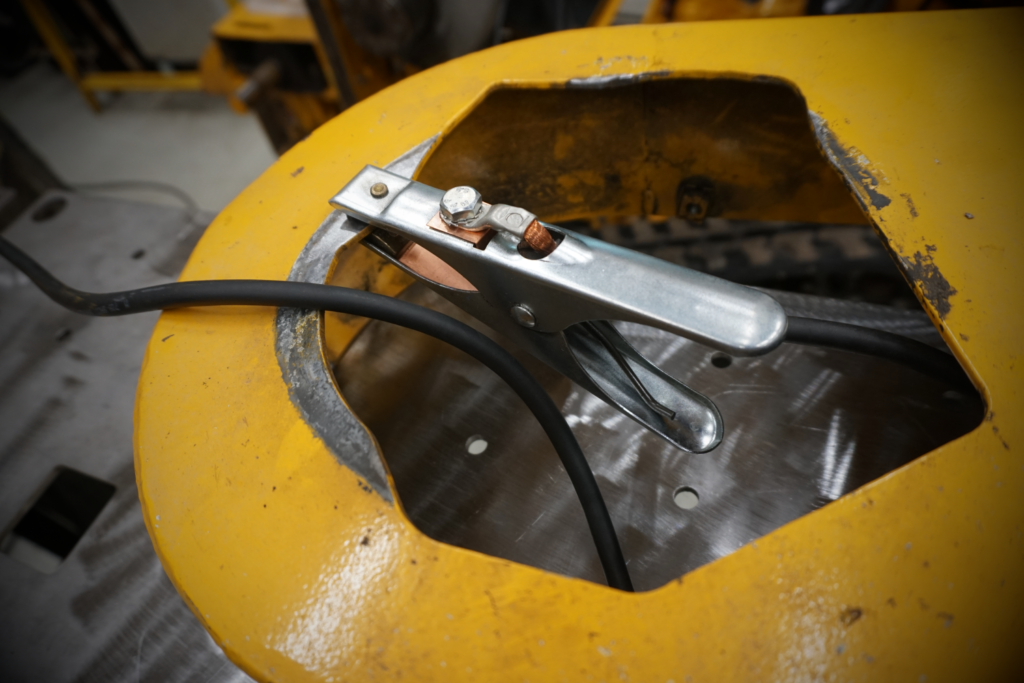
At this stage, it’s also a good idea to choose and clean a small spot for the grounding clamp. Pick an inconspicuous area of the piece that won’t interfere with the welding process.
Repair welding
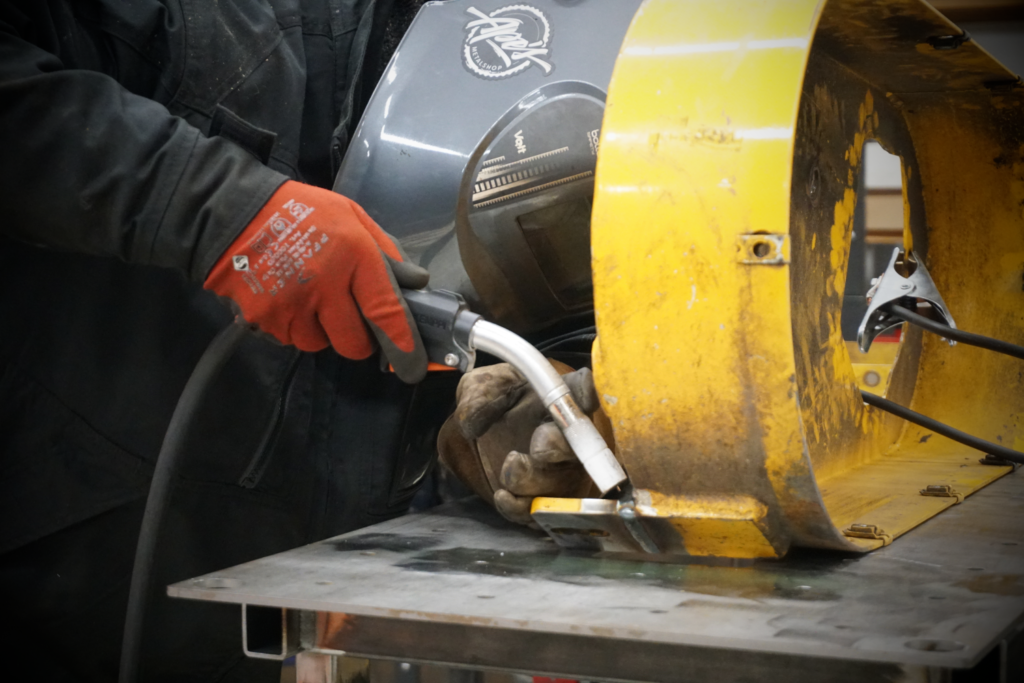
After cleaning, test fitting, and securing the parts, it’s time to weld. The actual welding process is nothing out of the ordinary—as long as the prep work has been done properly. If you’re working with a detached piece that can be rotated on a workbench, you have the advantage of choosing the most comfortable welding position. By turning the part and supporting it with blocks, you can decide on the best orientation and direction for welding. That meaning best for yourself.
However, if the piece is large and heavy, you don’t get that luxury. You’ll have to work in whatever position the situation demands—sometimes requiring some fairly acrobatic maneuvers. If the shape of the part is particularly awkward or challenging, extra time and effort may be needed to position it in a way that allows for a comfortable welding stance. You might even have to rethink how you hold the welding torch compared to your usual grip.
For this particular bracket, I tacked it in place, removed the 6mm support plate, and welded both sides. Since the casing had a simple shape, no special positioning was needed—just flipping it onto one side for the first weld and then onto the other side for the next.
Finishing after welding
The need for finishing after welding always depends on the project and the requirements. In quick-and-dirty repairs, the job is done the moment the last weld is done and still red hot. For finish on heavier machinery, I use the finishing process described below. It’s not overly refined, but it’s also not sloppy—by my standard, it’s “good enough” for use in a work machine.
After welding, I grind the welded areas with a wire brush disc attached to an angle grinder. This includes both the welds and the surrounding heat-affected areas. This significantlyreduces surface rust on the welded section. This is also a great trick if you want to add some “Wow!” factor to your work—even if you’re not planning to paint it. Give it a try sometime.
You can apply a decent amount of pressure with the brush, but be cautious—wire brush discs tend to grab onto sharp edges aggressively and can kick back in your hand quite violently. Also, the fine wire bristles that break off will embed themselves into your skin and eyeballs uncomfortably. Good protective gear is a must.


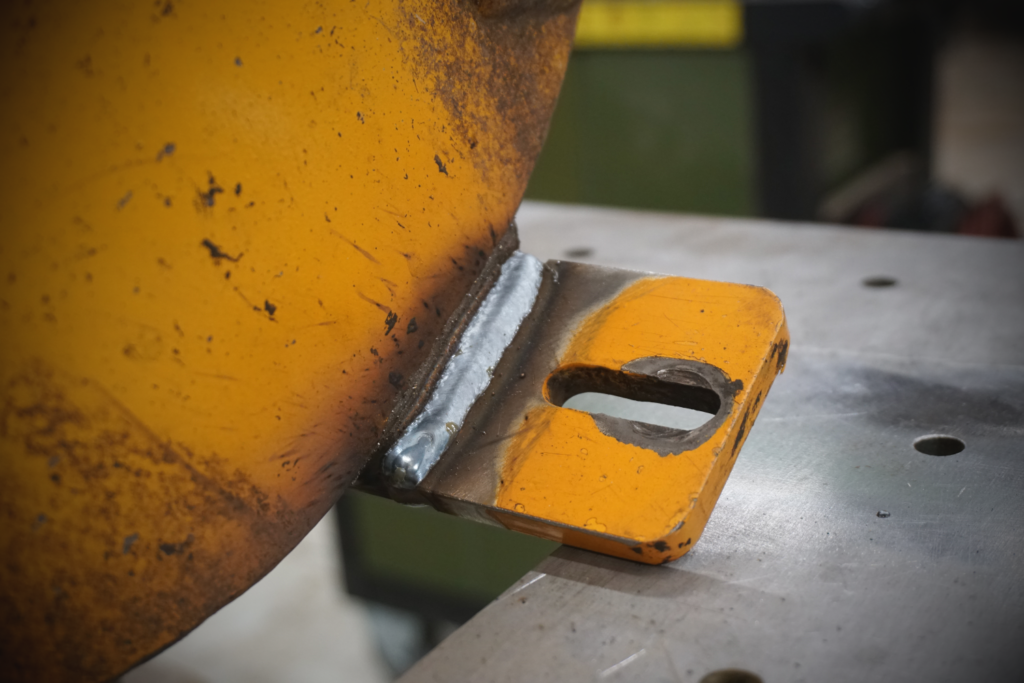
For this particular repair, the weld on one side was ground down flat with a flap disc to ensure the bracket sits flush and doesn’t rest unevenly on the weld. In general, though, welds should never—or very rarely—be ground down. If a weld looks terrible and you feel the need to grind it "out of sight," you're better off practicing your welding technique instead.
As the final step, I spray on some paint. For these types of work machine repairs, I keep a stock of common colors in spray cans (AT-Color paints from Motonet are a great value for money). I simply pick the closest maching color—in this case, yellow, applied straight on top without a primer. It’ll last as long as it needs to. Sometimes I do use a primer, but for rough applications like this, it’s rarely worth the effort or improves the outcome. From my experience, the wire brush cleaning before painting plays a bigger role in preventing corrosion than primer does.

As this example shows, repair welding differs from new fabrication primarily in prep and finishing work. The actual welding in this job consisted of just two 40mm-long welds—meaning the welding itself took up only a small fraction of the total job time.
Of course, this article isn’t the full picture of repair welding—just one example. The work varies greatly depending on the repair. Sometimes there’s far less prep and finishing, sometimes far more. Disassembly might be harder, parts may need extensive protection, and electronics may need to be disconnected to prevent damage. If the part can’t be brought to the shop, environmental protection might be necessary as well.
All these factors are worth explaining clearly to a boss or customer who’s impatiently asking "why a 5 cm weld can take so damn long!?"
If you're new to repair welding, it’s essential to first master the basics through various practice exercises. If this is a new topic for you, start with some beginner-friendly articles on welding fundamentals:
Adjusting the welding machine
Welding torch work angle
Push or pull?
Contact tip to workpiece distance
Why is MIG/MAG welding best technique for beginners?
How quickly can you learn welding?
Article written by Anssi Juvonen
Entrepreneur and owner of Ape’s metalshop Oy
Instructor and creator of Hitsauskurssi.fi®
